tattoos
Showing posts with label Registry. Show all posts

Wednesday, April 14, 2010

YM! Multi Messenger 8.x and 9.x

Ini merupakan sebuah software yang bisa membuat YM! kita duo lagin, jadi kita tidak perlu bergantina untuk login 2 account YM! yang kita punya. Sebenarnya cara kerjanya adalah mengedit registy YM! pada windows. Untuk cara manualnya berikut saya sertakan ( tanpa menggunakan software ) :

Masuk pada halaman REGEDIT

cari : Hkey_Current_User → Software → Yahoo → Pager → Test

pada jendela sebelah kanan, klik kanan, lalu new

pilih yang DWORD Value → kasih nama plural

Sudah jadi key nya, lalu double click, dan kasih nilai 1

then, OK

Selesai editing manualnya, coba jalankan YM!, lalu login. Selanjutnya jalankan lagi YM!, dan hasilnya ada dual YM! yang bisa dijalankan…image

Untuk cara mudahnya, silahkan download software berikut : DISINI atau DISINI.

Share singkat, semoga bermanfaat.

Monday, January 11, 2010

The Structure of the Registry

The Registry has a hierarchal structure, although it looks complicated the structure is similar to the directory structure on your hard disk, with Regedit being similar to Windows Explorer.


registry_tree


[font_body]Each main branch (denoted by a folder icon in the Registry Editor, see left) is called a Hive, and Hives contains Keys. Each key can contain other keys (sometimes referred to as sub-keys), as well as Values. The values contain the actual information stored in the Registry. There are three types of values; String, Binary, and DWORD - the use of these depends upon the context.

There are six main branches, each containing a specific portion of the information stored in the Registry. They are as follows:

  • HKEY_CLASSES_ROOT - This branch contains all of your file association mappings to support the drag-and-drop feature, OLE information, Windows shortcuts, and core aspects of the Windows user interface.
  • HKEY_CURRENT_USER - This branch links to the section of HKEY_USERS appropriate for the user currently logged onto the PC and contains information such as logon names, desktop settings, and Start menu settings.
  • HKEY_LOCAL_MACHINE - This branch contains computer specific information about the type of hardware, software, and other preferences on a given PC, this information is used for all users who log onto this computer.
  • HKEY_USERS - This branch contains individual preferences for each user of the computer, each user is represented by a SID sub-key located under the main branch.
  • HKEY_CURRENT_CONFIG - This branch links to the section of HKEY_LOCAL_MACHINE appropriate for the current hardware configuration.
  • HKEY_DYN_DATA - This branch points to the part of HKEY_LOCAL_MACHINE, for use with the Plug-&-Play features of Windows, this section is dymanic and will change as devices are added and removed from the system.

Each registry value is stored as one of five main data types:

  • REG_BINARY - This type stores the value as raw binary data. Most hardware component information is stored as binary data, and can be displayed in an editor in hexadecimal format.
  • REG_DWORD - This type represents the data by a four byte number and is commonly used for boolean values, such as "0" is disabled and "1" is enabled. Additionally many parameters for device driver and services are this type, and can be displayed in REGEDT32 in binary, hexadecimal and decimal format, or in REGEDIT in hexadecimal and decimal format.
  • REG_EXPAND_SZ - This type is an expandable data string that is string containing a variable to be replaced when called by an application. For example, for the following value, the string "%SystemRoot%" will replaced by the actual location of the directory containing the Windows NT system files. (This type is only available using an advanced registry editor such as REGEDT32)
  • REG_MULTI_SZ - This type is a multiple string used to represent values that contain lists or multiple values, each entry is separated by a NULL character. (This type is only available using an advanced registry editor such as REGEDT32)
  • REG_SZ - This type is a standard string, used to represent human readable text values.
Other data types not available through the standard registry editors include:
  • REG_DWORD_LITTLE_ENDIAN - A 32-bit number in little-endian format.
  • REG_DWORD_BIG_ENDIAN - A 32-bit number in big-endian format.
  • REG_LINK - A Unicode symbolic link. Used internally; applications should not use this type.
  • REG_NONE - No defined value type.
  • REG_QWORD - A 64-bit number.
  • REG_QWORD_LITTLE_ENDIAN - A 64-bit number in little-endian format.
  • REG_RESOURCE_LIST - A device-driver resource list.

How To Editing The Registry

The Registry Editor (REGEDIT.EXE) is included with most version of Windows (although you won't find it on the Start Menu) it enables you to view, search and edit the data within the Registry. There are several methods for starting the Registry Editor, the simplest is to click on the Start button, then select Run, and in the Open box type "regedit", and if the Registry Editor is installed it should now open and look like the image below.


image


  • Create a Shortcut to Regedit

This can be done by simply right-clicking on a blank area of your desktop, selecting New, then Shortcut, then in the Command line box enter "regedit.exe" and click Next, enter a friendly name (e.g. 'Registry Editor') then click Finish and now you can double click on the new icon to launch the Registry Editor.

  • Using Regedit to modify your Registry

Once you have started the Regedit you will notice that on the left side there is a tree with folders, and on the right the contents (values) of the currently selected folder.

Like Windows explorer, to expand a certain branch (see the structure of the registry section), click on the plus sign [+] to the left of any folder, or just double-click on the folder. To display the contents of a key (folder), just click the desired key, and look at the values listed on the right side. You can add a new key or value by selecting New from the Edit menu, or by right-clicking your mouse. And you can rename any value and almost any key with the same method used to rename files; right-click on an object and click rename, or click on it twice (slowly), or just press F2 on the keyboard. Lastly, you can delete a key or value by clicking on it, and pressing Delete on the keyboard, or by right-clicking on it, and choosing Delete.


Note: it is always a good idea to backup your registry before making any changes to it. It can be intimidating to a new user, and there is always the possibility of changing or deleting a critical setting causing you to have to reinstall the whole operating system. It's much better to be safe than sorry!

What is the Registry?

What is the Registry?

The Registry is a database used to store settings and options for the 32 bit versions of Microsoft Windows. It contains information and settings for all the hardware, software, users, and preferences of the PC. Whenever a user makes changes to a Control Panel settings, or File Associations, System Policies, or installed software, the changes are reflected and stored in the Registry.

image

The physical files that make up the registry are stored differently depending on your version of Windows; under Windows 95 & 98 it is contained in two hidden files in your Windows directory, called USER.DAT and SYSTEM.DAT, for Windows Me there is an additional CLASSES.DAT file, while under Windows NT/2000 the files are contained seperately in the %SystemRoot%\System32\Config directory. You can not edit these files directly, you must use a tool commonly known as a "Registry Editor" to make any changes.

Importing and Exporting Registry Settings

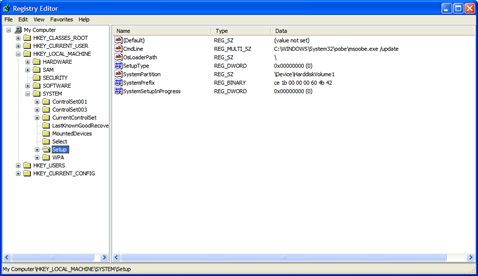
A great feature of the Registry Editor is it's ability to import and export registry settings to a text file, this text file, identified by the .REG extension, can then be saved or shared with other people to easily modify local registry settings. You can see the layout of these text files by simply exporting a key to a file and opening it in Notepad, to do this using the Registry Editor select a key, then from the "Registry" menu choose "Export Registry File...", choose a filename and save. If you open this file in notepad you will see a file similar to the example below:

REGEDIT4

[HKEY_LOCAL_MACHINE\SYSTEM\Setup]
"SetupType"=dword:00000000
"CmdLine"="setup -newsetup"
"SystemPrefix"=hex:c5,0b,00,00,00,40,36,02
image

The layout is quite simple, REGEDIT4 indicated the file type and version, [HKEY_LOCAL_MACHINE\SYSTEM\Setup] indicated the key the values are from, "SetupType"=dword:00000000 are the values themselves the portion after the "=" will vary depending on the type of value they are; DWORD, String or Binary.

So by simply editing this file to make the changes you want, it can then be easily distributed and all that need to be done is to double-click, or choose "Import" from the Registry menu, for the settings to be added to the system Registry.


  • Deleting keys or values using a REG file

It is also possible to delete keys and values using REG files. To delete a key start by using the same format as the the REG file above, but place a "-" symbol in front of the key name you want to delete. For example to delete the [HKEY_LOCAL_MACHINE\SYSTEM\Setup] key the reg file would look like this:

REGEDIT4

[-HKEY_LOCAL_MACHINE\SYSTEM\Setup]

The format used to delete individual values is similar, but instead of a minus sign in front of the whole key, place it after the equal sign of the value. For example, to delete the value "SetupType" the file would look like:

REGEDIT4

[HKEY_LOCAL_MACHINE\SYSTEM\Setup]
"SetupType"=-

Use this feature with care, as deleting the wrong key or value could cause major problems within the registry, so remember to always make a backup first.


  • Regedit Command Line Options

Regedit has a number of command line options to help automate it's use in either batch files or from the command prompt. Listed below are some of the options, please note the some of the functions are operating system specific.

regedit.exe [options] [filename] [regpath]

[filename]
Import .reg file into the registry

/s [filename]
Silent import, i.e. hide confirmation box when importing files

/e [filename] [regpath]
Export the registry to [filename] starting at [regpath]
e.g. regedit /e file.reg HKEY_USERS\.DEFAULT

/L:system
Specify the location of the system.dat to use

/R:user
Specify the location of the user.dat to use

/C [filename]
Compress (Windows 98)

/D [regpath]
Delete the specified key (Windows 98)

Auto Reboot On System Crash

By default, when the Windows XP operating system crashes an automatic reboot of the system occurs. While this behavior can be convenient, the downside is the error message accompanying the crash is not visible. Often times this information can be a great help in troubleshooting the source of the crash. This behavior can be modified in two ways; via the registry or using the System Properties property sheet.

  • [Start] [Run] [Regedit]
  • Registry Key: HKEY_LOCAL_MACHINE\SYSTEM\CurrentControlSet\Control\CrashControl
  • Modify/Create the Value Data Type(s) and Value Name(s) as detailed below.
  • Data Type: Dword // Value Name: AutoReboot
  • Setting for Value Data: [0 = AutoReboot Disabled / 1 = AutoReboot Enabled]
  • Exit Registry and Reboot

To avoid the inherent danger of editing the registry, the same results may be  obtained by using the procedure detailed below.

  • Open System Properties via Start
  • Control Panel
  • Performance and Maintenance
  • System [ System Properties may also be opened using the WinKey+Pause key combination ]
  • Select the Advanced tab and then click Settings in the Startup and Recovery section
  • In System Failure section, clear the checkbox next to Automatically Restart
  • Click OK and OK to exit

It should be noted that when you disable the Automatic Restart option you may be presented with the screen below.

image This is most likely to occur if the page file has been relocated to a different drive in order to improve virtual memory performance.

Restore Missing CD or DVD Drive

Reports have filtered in that CD or DVD drives will suddenly cease to exist in XP systems. Most often this has been reported in conjunction with program installations and Windows upgrades, but it has also happened for no apparent reason. This tweak will restore the missing drives after a reboot.

image

To Restore Missing CD or DVD Drive :

  • [Start] [Run] [Regedit]
  • Registry Key: HKEY_LOCAL_MACHINE\SYSTEM\CurrentControlSet\Control\Class
  • Key Name: {4D36E965-E325-11CE-BFC1-08002BE10318}
  • Value Data: [Delete All Value Data from UpperFilters and LowerFilters]
  • Note: Do not delete the Key or the Multi-String Values. Delete only the data values.
  • Exit Registry and Reboot

Launch Programs at Login Without Using the Startup Folder

This tweak allows a program to be launched when the user logs onto the computer. It can be set to run minimized and there is no trace of the executable in the Startup folder on the Start Menu nor in the Documents and Settings folder accessible via Windows Explorer.

image

To Launch Programs at Login Without Using the Startup Folder :

  • [Start] [Run] [Regedit]
  • Registry Key: HKEY_CURRENT_USER\Software\Microsoft\Windows\CurrentVersion\Run
  • Modify/Create the Value Data Type(s) and Value Name(s) as detailed below.
  • Data Type: REG_SZ [String Value] // Value Name: [Enter the Name of Program Executable]
  • Value Data: [Enter the Path to the Program Executable]
  • Exit Registry and Reboot

Invoke a Program Once then Delete from the Registry

This tweak allows you to set up a program that will be run once and then deleted so that it does not run again unless the entry is re-entered manually. The Runonce key does remain in the registry for reuse.

image

To Invoke a Program Once then Delete from the Registry :

  • [Start] [Run] [Regedit]
  • Registry Key: HKEY_CURRENT_USER\Software\Microsoft\Windows\CurrentVersion\
  • Create the Key: Runonce (The [Runonce] Key you create will remain in the registry for use with a new string value)
  • Create Data Type: REG_SZ [String Value]
  • Value Name: [Enter the Name of Program Executable]
  • Value Data: [Enter the Path to the Program Executable]
  • Exit Registry and Reboot

Customize Windows Media Player Title Bar

Allows you to change the title bar to read Windows Media Player provided by <your text>, so if I had entered text of [Blog si Otong], it would read: Windows Media Player provided by Blog si Otong.

image

To Customize Windows Media Player Title Bar :

  • [Start] [Run] [Regedit]
  • Registry Key: HKEY_CURRENT_USER\Software\Policies\Microsoft
  • Create the Key [WindowsMediaPlayer].
  • Modify/Create the Value Name [TitleBar] according to the Value Data listed below.
  • Data Type: REG_SZ [String Value] // Value Name: TitleBar
  • Value Data: [Enter the text to be displayed in the title bar]

Note: Whatever text you enter as the value data will be preceded by: Windows Media Player provided by, so if I had entered text of [Blog si Otong], it would read: Windows Media Player provided by Blog si Otong

  • Exit Registry and Reboot

A Faster Start Menu

I see no reason for there to be any delay when I click on the Start Menu. Effects are pretty, but I wouldn’t click on it if I didn’t have business inside, so lets get it open and get moving. The default speed can be adjusted with a quick registry entry.

The default value is 400. Set it to 0 and the delay is gone, but it will be nearly impossible to move the mouse fast enough not to activate [All Programs] if you mouse over it in route to your final selection. It's easy to train yourself to move the pointer to the right after clicking Start to avoid activating All Programs. Pick a number that suits your style and make the change, then test it until you find a good compromise between speed and usability.

image

To Faster Start Menu :

  • [Start] [Run] [Regedit]
  • Registry Key: HKEY_CURRENT_USER\Control Panel\Desktop
  • Modify/Create the Value Data Type(s) and Value Name(s) as detailed below.
  • Data Type: String Value // Value Name: MenuShowDelay
  • Setting for Value Data: [Default = 400 / Adjust to Preference]
  • Exit Registry and Reboot

Desktop Context Menu

By default, when a user right clicks on the desktop in Windows XP a context menu is displayed. Implementing the Enable/Disable Desktop Context Menu edit will remove the ability to display a context menu by right clicking the desktop, items on the desktop, and items in Windows Explorer. It does not disable context menus in Internet Explorer. This registry edit can be set either on a user or machine basis.

image

To Enable/Disable for Current User

  • [Start] [Run] [Regedit]
  • Registry Key: HKEY_CURRENT_USER\Software\Microsoft\Windows\CurrentVersion\Policies\Explorer
  • Modify/Create the Value Data Type(s) and Value Name(s) as detailed below.
  • Data Type: DWORD // Value Name: NoViewContextMenu
  • Setting for Value Data: [0 = Disabled / 1 = Enabled]
  • Exit Registry and Reboot

To Enable/Disable for Local Machine

  • [Start] [Run] [Regedit]
  • Registry Key: HKEY_LOCAL_MACHINE\SOFTWARE\Microsoft\Windows\CurrentVersion\policies\Explorer
  • Modify/Create the Value Data Type(s) and Value Name(s) as detailed below.
  • Data Type: DWORD // Value Name: NoViewContextMenu
  • Setting for Value Data: [0 = Disabled / 1 = Enabled]
  • Exit Registry and Reboot

Tuesday, December 1, 2009

Speed Up Menu Display

When using the start menu the you will notice a delay between different tiers of the menu hierarchy. For the fastest computer experience possible I recommend changing this value to zero. This will allow the different tiers to appear instantly.

  • Start Regedit with RUN, (WinLogo+R) and then Type regedit, OK

image

     
  • Navigate to HKEY_CURRENT_USER\Control Panel\Desktop
    Select MenuShowDelay from the list on the right

image

  • Right on it and select Modify

image

  • Change the value to 0, OK

image

  • Reboot your computer

Speed Up HTTP Requests On Browser

To comply with current Internet standards, Browser limits the number of simultaneous downloads to two downloads, plus one queued download. This configuration is a function of the browser. However, as connection speeds increase, and the number of total connections that are allowed to Internet servers increase, the two-connection limit may be restrictive.

Please Note: Changing the maximum number of connections beyond two is a violation of Internet standards; use at your own risk!

To increase the number of simultaneous connections that are allowed, follow these steps :


  • RUN Regedit, (WinLogo+R) and then Type “Regedit” (Without “) ==> OK

image

  • Go to HKEY_CURRENT_USER \ Software \ Microsoft \ Windows \ CurrentVersion \ Internet Settings

image

STEP 1

  • In the Right Coloumb, Right Click, New ==> DWORD Value, Name the new value MaxConnectionsPer1_0Server (If Its Already, just Edit Value Data) , Right-click the MaxConnectionsPer1_0Server value and choose Modify

 image

  • Under Base, click the radio button next to Decimal
    image
  • In the Value Data : box enter the number of simultaneous connections you want to set, set 8. click OK


STEP 2

  • Repeat step 1, but the name of new value is MaxConnectionsPerServer

Finish, and Exit the Regedit, Restart Computer…


blogger templates | Blogger